

How To Fix a Hole in Your UGGs: A Step By Step Guide To Patching UGG Boots
Written by Jaillan Yehia
My finished patched UGG Boots
*This post may contain affiliate links, for the cookie consent, privacy policy and affiliate disclosure click here*
I’ve got 23 pairs of boots. Yes that’s a lot I know! What can I tell you, I’m addicted to buying shoes wherever I go. Always have been, always will be.
But the funny thing is that no matter how many gorgeous new pairs of boots I buy – and justify to myself that I need – I keep going back to the same 3 or 4 pairs over and over again.
There’s the perfect pair of natural leather ankle boots with a small heel that I’ve packed for all my city breaks for years. Then there’s my go-to pair of knee high suede and leather vintage-style dark green boots that I got literally decades ago.
And then there are my beloved UGG boots.
What Does This Post Cover?
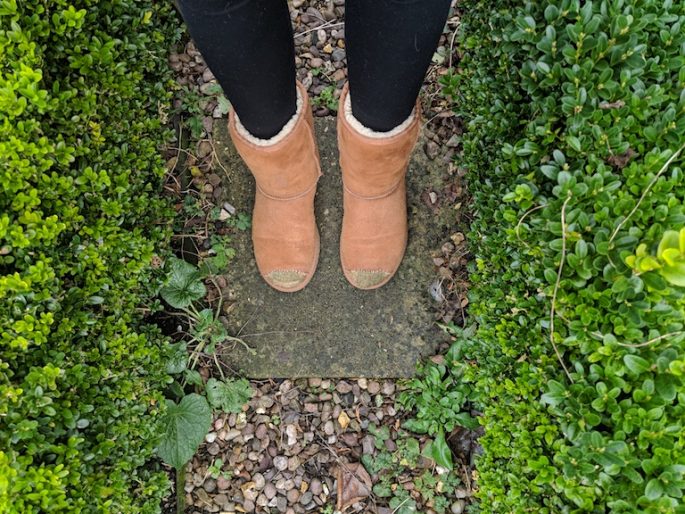
Why You Should Patch Your UGG Boots
Patched UGGs: I won’t be wearing them to the MET Ball, but not a bad result for a little effort
Probably my number one pair of boots of all time are my original classic short chestnut UGG boots which I have had since 2004. I bought them for a cold winter commute so long ago that I had to check my own Linkedin profile to find out when I worked in that job.
These babies have seen me through so many years; different jobs, boyfriends, homes and destinations, and putting them on is like getting a warm hug from an old friend.
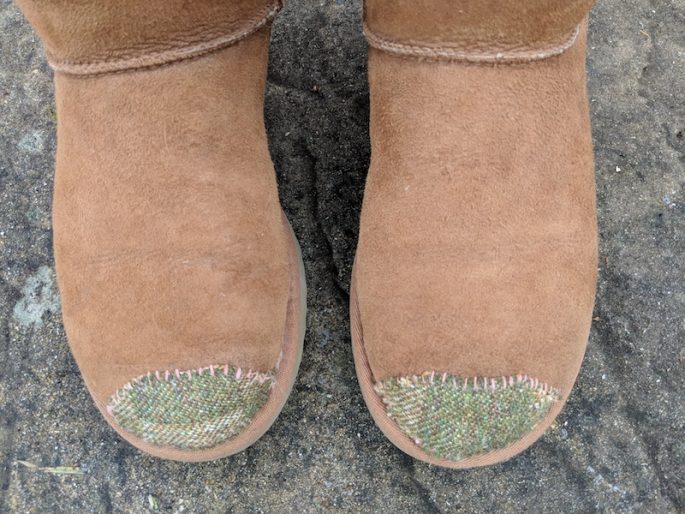
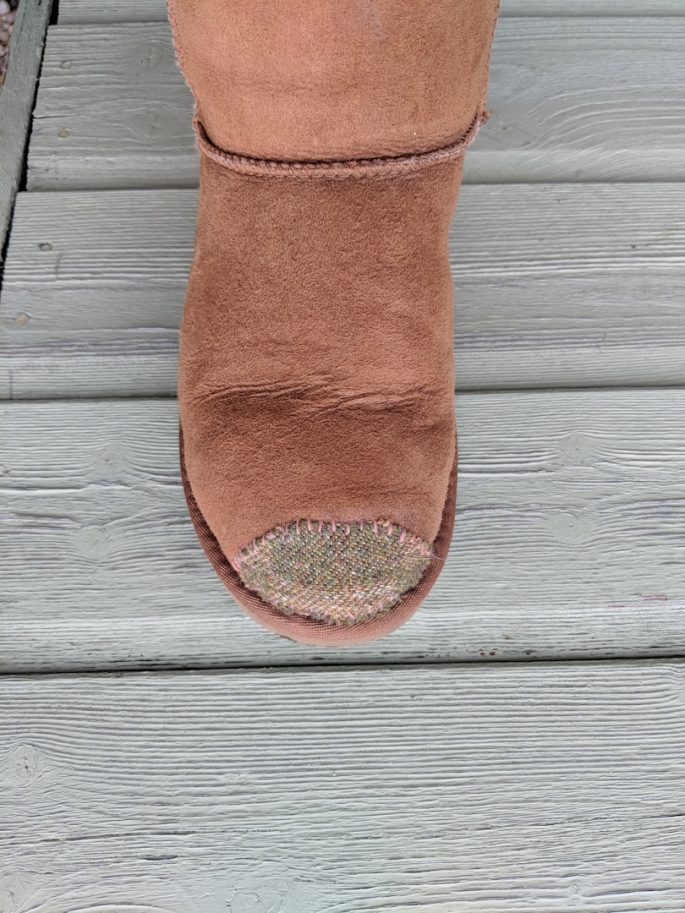
They have lasted perfectly so they have been a great investment – apart from a small hole in the toe of one boot which appeared pretty soon after buying them.
I don’t like waste and today’s throwaway culture so I simply sewed up the hole, but it kept coming back, and it got bigger each time, so I decided I needed a better solution.
After checking all the different ways to patch sheepskin (by checking I mean Googling) I went with a fabric patch and I’m really happy with the finished result, even if it does look quite rustic.
Suffice to say these UGG boots are old and if I can successfully patch a pair of 14 year old UGG boots, and give them a whole new lease of life, so can you.
I also have to say, boy did these boots prove my (then) boyfriend wrong. Guys love to complain when we spend a lot of money on shoes, but considering these boots have outlasted everything else in my wardrobe and given me 14 years of loyal service, they were an amazing investment.

I’ve bought a lot of boots in my time but these Short UGGs have outlasted them all
Why Do UGG Boots Get Holes In The Toes Anyway?
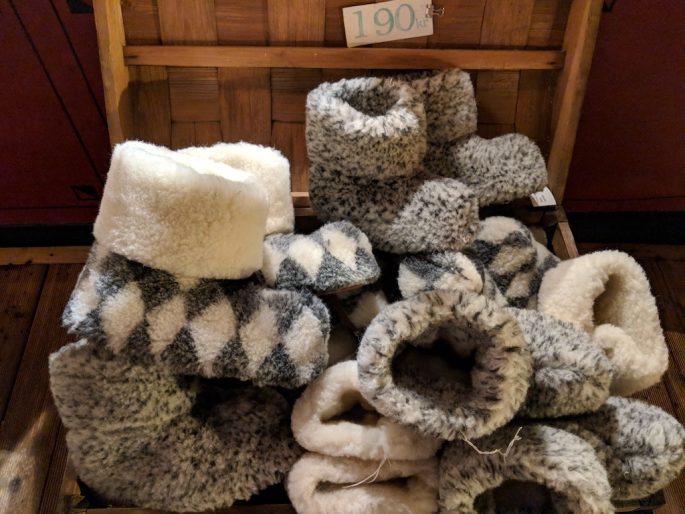
Sheepskin slippers in Scandinavia
I have a much newer pair of UGGs, classic tall sand-coloured UGGs, which are lovely and cosy and have a great snow-bunny aesthetic but get dirty when you so much as look at them, so I prefer my chestnut short UGGs hands down.
The only problem is, despite both pairs being the same size, the chestnut ones were always a little tight on my left foot and the constant rubbing of my toe against the sheepskin wore a tiny hole in the front of the boot.
It seems that I’m far from the only person to experience this problem, and some people have complained to UGG about the unreliable sizing which leads to the holes in the toes if the fit is too snug.
I never thought to complain, but as sheepskin is one of those materials which usually gives a LOT it is hard to judge when trying them on just how the boots will mould to your foot over time. I have a couple of pairs of sheepskin slippers including the ones pictured above, which I got in Denmark, and they stretched out a ton, far more than UGGs.
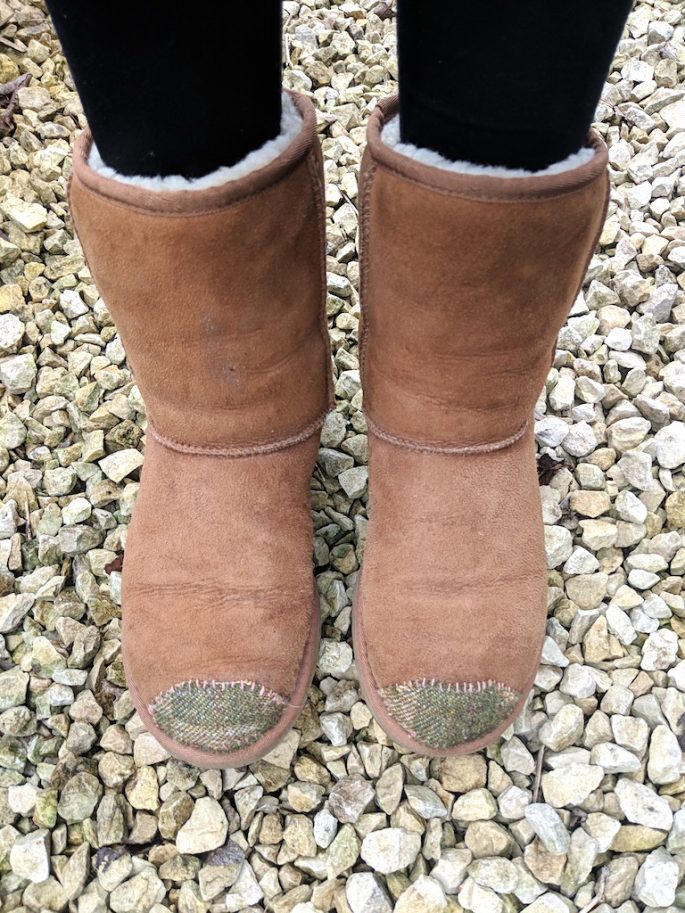
So, What Are Your Options For Patching Holes In UGG Boots?
My UGG Boots after patching
First up, I’m nothing if not a researcher, so once I’d set my mind to repairing rather than replacing my short UGGs I started combing the internet for different methods of repairing UGG boots and other sheepskin clothing.
I took the usual 21st century approach to this: I watched YouTube videos, read blog posts and browsed pinterest boards looking for ideas and inspiration.
The repair options I found fell into these categories:
1. Using shoo goo or other glue to fill the hole in your UGGs
I have shoo goo (a product I’ve never seen in the UK apart from on Amazon) but I hung onto from my time in Canada), a glue gun and craft glue so I considered this carefully but decided against it in the end as I didn’t want to create a hard surface or damage the surrounding sheepskin. I also knew the result would be ugly and I’d still need to make it look pretty afterwards.
2. Take UGG boots to be repaired professionally with another piece of sheepskin
A few forums mentioned cobblers fixing sheepskin by patching it from within, but I couldn’t find a picture to judge it, and was worried the patch would look ugly, be unduly expensive or end up limiting the size of the shoe even more. Honestly I also couldn’t be bothered to drive around visiting branches of Timpsons to ask them if they could help. Plus I like the challenge of accomplishing things myself.
3. Needle felt a design over the hole in your UGGs
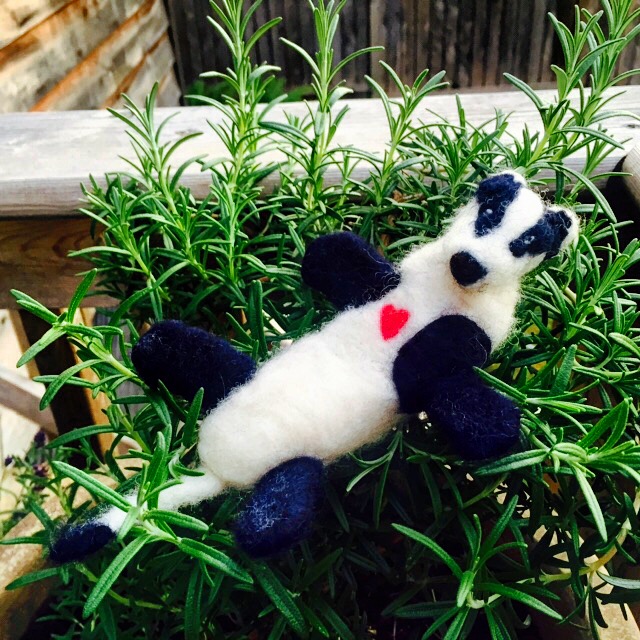 I love needle felting (I’m not very good, but I am just about ok as you can see from this lil badger I made!) so I actually tried this on my UGG boots.
I had really high hopes of success because it seemed to make sense that the natural fibres would meld with the sheepskin. I also found a great image on Pinterest of a needle felted heart design on an UGG boot and other people posted about needle felting cute hearts to cover holes in sweaters, so I thought, Bingo!
I even bought a cookie cutter to use as a template for my needle felted design, but I never got that far. I have to report that not only was it a big fat failure, but removing the mess made the hole a lot bigger than it was before. I was using a single needle but I may have been heavy handed with the amount of wool I used and basically I ended up with a hard lump of wool that was sticking out of the hole in an unsightly way and was uncomfortable. Back to the drawing board.
4. Patch UGGs with fabric
I could see that adding an extra piece of fabric was the solution that allowed the most give in the area where the hole was, so it was more likely to last long term. I found a couple of references for patches – some people covered the whole front of the boot, or a smaller area while others had used actual iron-on/ sew-on patches. I bought a couple of fun patches but in the end didn’t want that casual style and so I looked at what I had in my kit and I came up with my own fabric patch solution for my UGGs.
Everything You Need to Patch Your UGGs With Fabric

In the middle of fixing my UGGs
1. The fabric of your choice
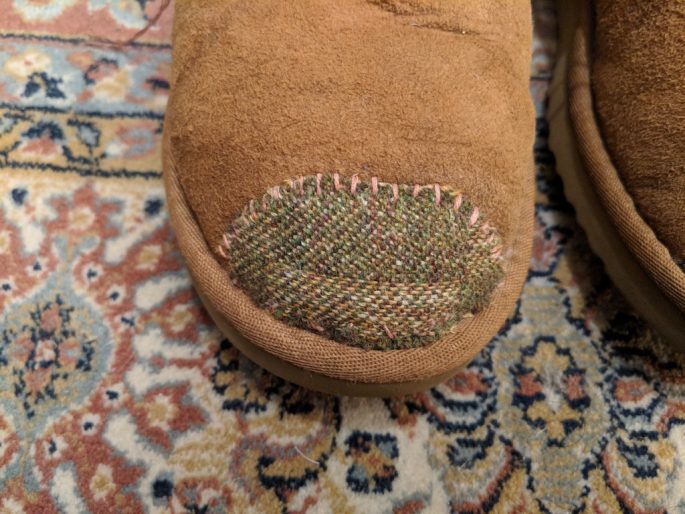
I went with a green and brown tartan because I wanted an earthy colour and had this in my sewing kit anyway. I’d sent off for a selection of fabric swatches when I was having a sofa reupholstered and kept all of them for little jobs just like this, but you can always go into a fabric shop and ask for a small sample. It’s probably best to choose a fabric which won’t get dirty easily and has some give. I like that the tartan covers some of my messy stitching, but having a plain colour would probably look neater.
2. Scissors & scrap paper
Keep big kitchen scissors for definitive cuts and small ones to hand for detailing. Use newspaper or scrap paper to make a template (not as hard as it sounds).
3. Embroidery thread, a needle with a big eye, a thimble, tweezers or a stitch unpicking tool
I had to go and buy some embroidery thread (this is actually multiple strands of thread giving a thicker and more solid, hopefully more durable, finish) but I only spent £3 so a tiny investment. A decent sized needle will be fine and I recommend a stitch unpicker for mistakes but tweezers work too. I used the thimble when shoving the needle through the thick sheepskin blind. I still stabbed my fingers a few times, but hey ho.
4. Hemming web
This was my eureka moment, I realised that by bonding the fabric patch to the UGG boots with hemming web or hemming tape I could get the benefits of glue without the hard finish and still have the fabric be able to move. Hemming web is just really thin strips of mesh which will become like a mild glue when heated, and is designed as the name suggests for hems.
5. A steam iron & a damp white cloth or old towel
This is used to activate the hemming web, with a damp towel as a barrier. Use white to prevent colour transfer onto your UGGs from the towel, but use a towel you don’t care about in case the colour bleeds from the UGGs on the fabric.
6. Pins
A pretty good sewing staple, securing the patch with pins to keep it in place while you work helps a lot.
step By Step Guide To Fixing Your UGG Boots
Step 1: Clean your boots UGG Boots in Preparation For Repair
The first thing I decided to do was clean my UGGs so I had a nice base to work with.
I have to put my hands up and admit I had no idea I would actually write a blog post about fixing my UGG boots so I didn’t take any pictures of this process.
I’m a travel blogger, but I realized after I finished that UGGs are my favourite all-purpose travel shoes, and fixing rather than replacing a pair could save someone enough money for a an entire weekend away, so I decided to share my tips anyway.
I did a whole separate bunch of research on cleaning UGGs and ended up using an eraser to remove all the stains from the sole and rubber edge of the UGGs (worked a treat) and then sprinkled them with talc to soak up any dirt, and left them overnight.
I then brushed out the talc with a soft nail brush then dabbed the sheepskin with the suds from a diluted solution of woolite on a white cloth, then dabbed more with clean water to ‘rinse’. I then stuffed the boots with old T shirts and left them to dry naturally in a not-hot but not-cold place, just as instructed by Dr. Google. When they were almost dry I put them in the tumble dryer for a few minutes on gentle, to fluff them up.
Step 2: Stuff the UGG Boots with newspaper or an old T shirt
This helps mimic the way the boot will be shaped when it is being worn. Using more newspaper or scrap paper cut out the ideal shape to cover the hole, noticing that with the curvature of the boot you’ll probably need to trim around the base of the toe where the sheepskin meets the rubber.
Step 3: Using this template cut out two identical pieces of fabric, one for each UGG boot
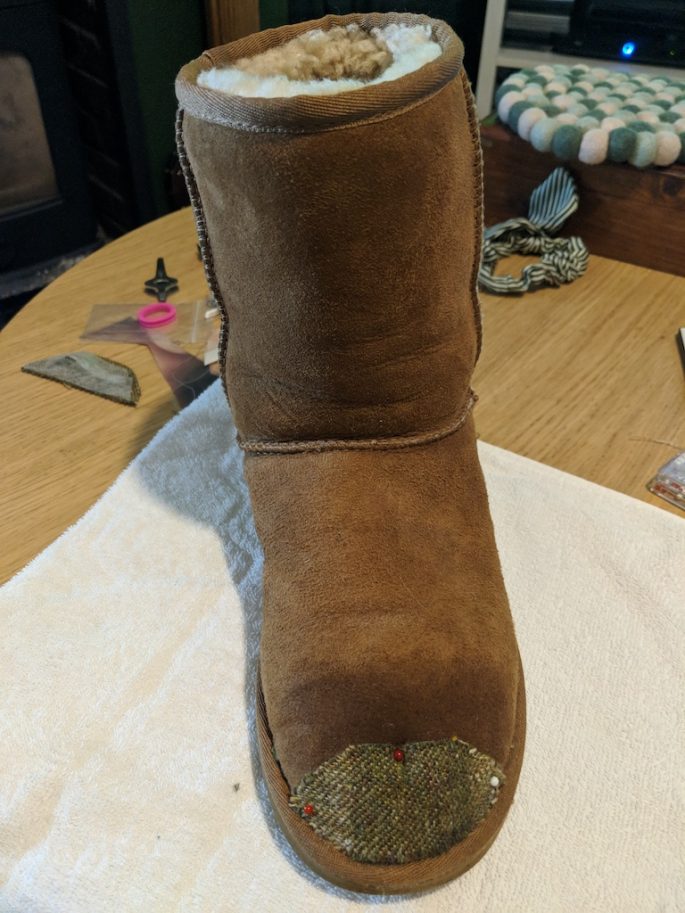
UGG Boots mid-fix
Even if the other shoe is perfect, one patch is gonna look weird, right? My patches are quite small because I had limited fabric.
Step 4: Cut Hemming web to the same size as your fabric patches
You ideally want the hemming webbing to cover the entire area of the patch – this is what I used the small scissors for.
Step 5: Pin the fabric and hemming web to the UGG boot
This secures it in place while you finish the job.
Step 6: Iron the fabric patch on, leave to cool
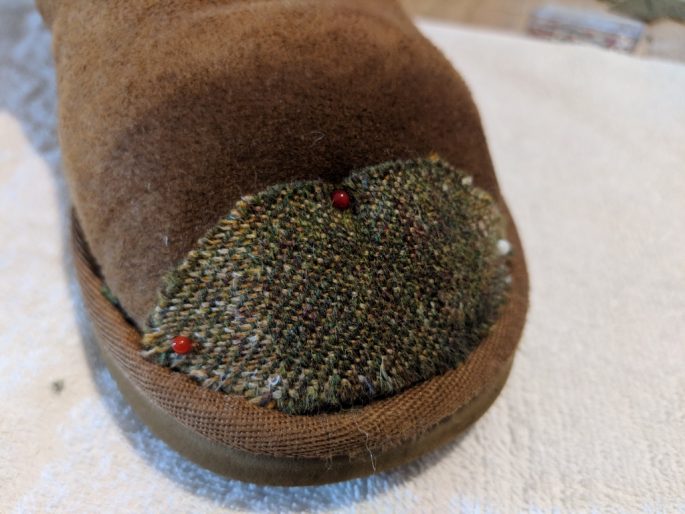
After pinning and ironing the patch this is how it looked – the dark area is wet from the damp cloth.
Using a damp white cloth as a barrier, hold a steam iron on each area of the patch for 5-10 seconds at a time until the bond has been created between the UGG and the fabric. Once it has cooled you can test to see if it is loose and if needed iron it some more. Once the fabric is bonded on and cooled down you can start sewing
Step 7: Sew the edges of the fabric patch to finish your UGG boot fix
I used contrasting pink thread because I like the colour combination of pink and green, but it probably would have looked tidier if I had gone for the same colour as the fabric.
Keeping the stitches consistent can be tricky and that’s where the thimble helps, as you may need to pop the needle up in a couple of spots before finding the right one on each stitch. As with all sewing I start and finish with 3 tiny stitches, one on top of the other, which I was taught at primary school and has never failed me.
Now I can throw on my 14 year old UGG boots on a cold miserable winter’s day and my feet stay warm and dry – and I have a budget of £165 to spend on travel instead of more shoes.
PIN IT FOR LATER


Trackback from your site.